 Recommend to a friend
Unlock more leads by capturing partial entries from your forms. Easily follow up with interested leads and turn them into loyal customers.
How many leads are you losing when visitors don’t finish your forms?
Unlock more leads by capturing partial entries from your forms. Easily follow up with interested leads and turn them into loyal customers.
How many leads are you losing when visitors don’t finish your forms?
When you add a "Create Contact" menu item for Contact Enhanced you can select whether your contacts are automatically registered as a Joomla user.
When you are creating a menu item using Joomla Menu options.
Then go to the Extension → Plugin Manager, Edit the User - CE Contact Creator plugin, and under the Advanced Tab set which fields you want to synchronize.
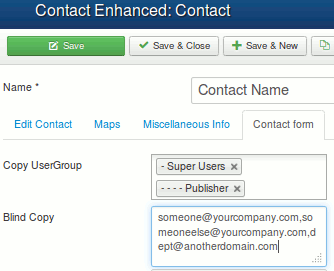
Sometimes your Contact Enhanced →Contact actually represents an entire department or user group, so you need to send emails to several email addresses when the Contact Form is submitted. Keep reading to find out how this can be done.
With Contact Enhanced SalesForce integration you can capture contact information from users and automatically generate new leads in salesforce.com, enabling you to respond in real-time to customer requests.

1. Log in to SalesForce.com, then click on [Your Name] → Setup → Customize → Leads → Web-to-Lead, then Click on Generate, find your OID and copy the value;
2. Select Components → Contact Enhanced → Contacts from the drop-down menu on the back-end of your Joomla! installation; Then edit an existing contact or create a new one;
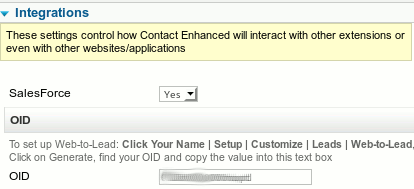
3. Under the Integrations tab set the "" to Yes and enter the OID you've copied from SalesForce.com;
4. Make sure the Custom Field's Aliases matches SalesForce field's names, except for First Name and Last Name, which you must use the Name and Surname Custom Field types, which do not let you change the Alias;
You can easily change the field size in any Custom Field (types: Text, Textarea, selectlist,...)
There are three ways to accomplish this:
{gdata id=|oI1w3djF0e4|} You can integrate Contact Enhanced with Google Docs -> Spreadsheets;
Attributes provide additional information about HTML elements, this values can be used in the Custom Fields Attributes field.
Makes a field required based on a radio button selection.
Before you try to create something a bit more advanced you have to understand how Contact Enhanced works, therefore I suggest you to create a form and test most of its features before you continue; Also, please take a look at the online documentation.
You can configure Contact Enhanced to display a Registration Form, however please keep in mind that this is not the main purpose of Contact Enhanced, therefore the only Form Fields recorded on the User's database table are name, username, -mail and password.
This is something a few users ask for, but we do not encourage/recommend using Contact Enhanced as a registration form. There are many registrations extensions available for Joomla at JED.
{gdata title=|Missing screencast| app=|none|}
HTML anchor < a > tag is also very useful for creating bookmark links. HTML bookmark tag links help in linking the different parts of a single HTML document. HTML bookmark tag link navigates the web page to the targeted location of same or different web page. name attribute of HTML anchor <a> tag provides the feature of bookmark links. In Contact Enhanced there are the following bookmark tags:
<a name="sidebar" ></a>
<a name="map" ></a>
<a name="form" ></a>
You can navigate to this bookmark by using href="#form" in another HTML anchor <a> tag link, the code below works within the same Contact Enhanced page:
<a href="#form">Go to Contact Form</a>
If you want to open the bookmark of another web page then you have to specify the page name also. For example you want to add a link a link to the Contact Enhanced form inside a content Article, then you can add the target bookmark link to your content article as following:
<a href="/http://yoursite.com/uri_to_the_contact_enhanced_contact_form#form">
Go to Contact Form</a>
HTML templates gives you great flexibility:
Select Components → Contact Enhanced from the drop-down menu on the back-end of your Joomla! then click the Parameters (Options) button and set Show user info to No;
{gdata title=|Missing screencast| app=|none|}
You can set each form a different Custom Redirect.
Select a contact from Components -> Contact Enhanced -> Contacts, then set Custom redirect under the Advanced Parameters slider;![]()
![]() Select a contact from Components -> Contact Enhanced -> Contacts, then set Redirect under the Contact Form slider;
Select a contact from Components -> Contact Enhanced -> Contacts, then set Redirect under the Contact Form slider;
In the Custom Redirect paramenter you have to write: index.php?option=com_content&view=article&task=view&id=0000, Change 0000 for the article id that can be found at article manager, or you can add any URL starting with http://
Please note that if you use an internal URL starting with index.php the Contact Enhanced will set a "Thank you note" in the System Message, however if you add an internal URL starting with http:// the System Message will not be set.
Copyright © 2018 IdealExtensions.com. All Rights Reserved.