Contact Enhanced Documentation
Contact Enhanced has the ability to allow webmasters to assign Form Fields to contact forms. Form Fields offer a lot of flexibility that allows you to create more a simple contact form.
Description
You can display one or more Custom Fields in the Components → Contact Enhanced →Recorded Messages (back-end)list.
Requirement
- Contact Enhanced 3.2+;
Usage
Select Components → Contact Enhanced → Form Fields from the drop-down menu on the back-end of your Joomla! installation. Then under the General Parameters tab set Show on Recorded Messages to Show;
Description
How to display Form Fields in multiple columns.
Requirement
- Have setup and Category and Contact;
- Have watched the Form Fields -> Basic Features screencast;
Usage
Go to Components -> Contact Enhanced -> Form Fields.
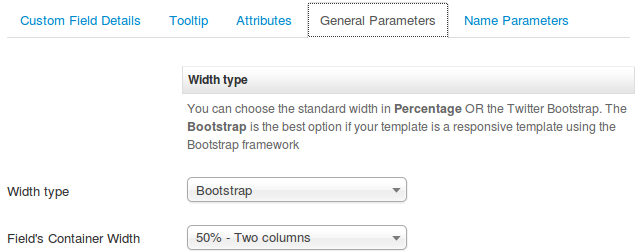
1. Edit each Custom Field and under the General Parameters tab set the Width type to either Bootstrap OR Percentage.
Set to Bootstrap if your template is compatible with Bootstrap javascript library and if you want your form to be responsive.
2. Adjust the Field's Container Width to the desired number of columns.
You have to perform steps 1 and 2 for each custom field.
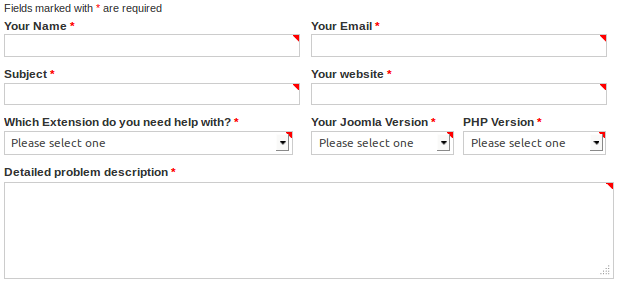
Keep in mind that the field order will be from left to right (top->bottom), so you can have multiple columns. Please see screenshot below for example.
You might also create a CSS Custom Field and add the CSS rule below to make the fields take the full width;
.ce-cf-container{width:95%}Screenshot
Description
Creates an auto complete Form Field where you can search content from any table in the database.
Requirement
- Have watched the Form Fields -> Basic Features screencast.
Usage
Select Components → Contact Enhanced → Form Fields from the drop-down menu on the back-end of your Joomla! installation, then Select AutoComplete from the Field Type select list;
Choose a category for your Form Field, then Save the changes.
Add a SQL query to the value. The SQL Query must return one column only and the column name OR alias must be "value". Use {selectresult} as the text to search for
Code Example
SELECT title AS value
FROM #__content
WHERE state=1
AND title LIKE '%{selectresult}%'
ORDER BY title ASC
{gdata id=|6e6UREuTOcY|}
Description
You can break a contact form into multiple pages. This will allow you to collect data in a contact form over multiple pages (steps) instead of all in one.

Description
You can add PHP code to a page where a Contact Enhanced form is published.
Requirement
- Have watched the Form Fields -> Basic Features screencast;
- Some PHP knowledge;
- FireBug (optional) might help in this task, in case you the PHP fields adds javascript code as well;

Description
You can add any JavaScript code to a page where a Contact Enhanced form is published. Please do not confuse this Custom Field with the Attributes Field of every Custom Field where you can add html attributes such as onblur="", onchange="", cols="", rows="" ,....
Requirement
- Have watched the Form Fields -> Basic Features screencast;
- Some Javascript knowledge;
- FireBug might help in this task; (optional);
Description
You can add any CSS code to a page where a Contact Enhanced form is published. Please do not confuse this Custom Field with the Attributes Field of every Custom Field where you can add the style="" attribute.
Requirement
- Have watched the Form Fields -> Basic Features screencast;
- Some CSS knowledge;
- FireBug might help in this task; (optional);
Description
This form field allows your user to subscribe to one or several Acymailing Lists.
Requirements - Have configured at least one list in AcyMailing
- Have watched the Form Fields -> Basic Features screencast;
Description
With the Constant Contact Form Field integration, you can now sign up any user to a Constant Contact list with a few simple steps. Constant Contact is a field and does not display Constant Contact fields, so additional CE fields need to be assigned to the category that match Constant Contact (Surname, Name, Email, City and State). This way Contact Enhanced will submit the fields to Constant Contact;
Requirements
- Have a Constant Contact account and at least one list created
- Have a Mashery account (explained later);
Description
How to display Custom Fields in multiple languages;
Requirement
- Have Joomla Multi-lingual plugins enabled;
- Have created the language content in Joomla! Admin -> Extensions -> Language Manager;
- Joomla 1.6 and newer;
Usage
When you first install Contact Enhanced, all Form Fields are set to ALL languages. So first, you need to copy the current Form Fields to one of the languages.
Batch Process:
Go to Components -> Contact Enhanced -> Form fields, Select ALL Fields you need in multiple Languages, then click on the Batch button and move the fields to the new language.
One by one:
Go to Components -> Contact Enhanced -> Form fields, open the original form field set the language to English (or another language) under the Publishing Info slider and then change the name of the field for the new language and set the language to the chosen one and hit Save as a Copy and you are done.
Joomla 1.5:
In Joomla 1.5 it is a bit more complicated because it requires you to use Joom!Fish and it cannot translate multiple database tables per component. Please read this forum post.
Description
{gdata id=|hp6n36Bclo4|} With Campaign Monitor Form Field your can display your CampaignMonitor lists so your users can subscribe themselves when they send submit the Contact form.
Requirements
- Have watched the Form Fields -> Basic Features screencast;
- You have to sign up to Campaign Monitor and add the API and ClientID to the Custom Field Parameters, which are only displayed after you save the form;
- Campaign Monitor API requires Apache cURL module to be enabled [1];
Description
Contact Enhanced allows your user to upload Multiple Files at once, with multiple file selection, progress bars and validation. The files are uploaded via Ajax, so the form will be processed much faster (version 3.2 and newer).
Requirement
- Have watched the Form Fields -> Basic Features screencast;
- In Joomla 3.2 and newer, jQuery and Bootstrap will be loaded (automatically);
Chained Selects lets you "chain" multiple select lists together so that the selection in a "parent" list can tailor the options available in a "child" list. Chained Selects supports unlimited unlimited number of "chains" in in a form.
In order to Create a chain select list you have to use the SQL Form Field and the fields will be loaded using AJAX JSON Calls.
The first option of a Chain select list can also be a Radio list.
{gdata id=|F-fERcoMN2U|}
Description
Form Fields allows you to extend the functionality of Contact Enhanced.
Requirement
- Have created one or more Contact Enhanced categories;
important Information
- You can add as many Form Fields as you'd like;
- The Name, Email, Subject and Recipient Form Field types have special behaviors;
- Every Form MUST have the Name and Email Form Field types; If you don't want to display them, then set the value and hide them;
- Read more information regarding the Form Fields in the Documentation Page.
Usage
Select Components → Contact Enhanced → Form Fields from the drop-down menu of the Joomla! Administrator Panel.
To add a new Form Field, press the "New" icon in the toolbar. To edit an existing Form Field, click on the Form Field's Name OR click the Form Field's checkbox and then click on the "Edit" icon in the toolbar.


{gdata id=|bTBFtCUnsqU|}
Value:
Any text
The value will be displayed in the email message;
Advanced:
If you want to integrate Contact Enhanced with other systems you just you can send variables in the URL that will populate the fields;
You will just have to add alias=example to the URL, where alias is the Form Field alias. For example we'll prefill the Subject and website fields in our Support Contact Form, take a look:
<input> elements of type radio are generally used in radio groups—collections of radio buttons describing a set of related options. Only one radio button in a given group can be selected at the same time. Radio buttons are typically rendered as small circles, which are filled or highlighted when selected.
Example
A select list (also known as drop-down list) is a form element that allows the user to select an option from a range of options.
Example:
Usage:
Go to Components → Contact Enhanced → Form Fields, click on the New button, then set the Form Field Type to Select List.
Edit Custom Field Value by adding a new row for each new option. The first option is the field's value and the second is the label.
{gdata id=|4g-KZdpjb1g|}
Value:
- Blank;
- Some text or Values separated by | (if you want to display as a select list)
- If the Form Field is set to hide you can add any Form Field input in the Subject by adding the following syntax {ALIAS} where ALIAS is the Form Field ALIAS; The {ALIAS} cannot be a checkbox Form Field;
Subject Form Field Parameters
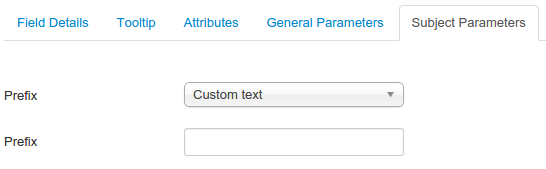
With the Subject Form Field type you have four options of prefix, which will be added after the field is submitted:
- None: No prefix will be added;
- Custom Text: You can add your custom text for the prefix. You can also add any Form Field input {name}, {email}, {user_ip} or any other form field with the following syntax {ALIAS} where ALIAS is the Form Field ALIAS; The {ALIAS} cannot be a checkbox;
- Site Name: Will prepend the site name to the subject;
- Current Content Title: In case the form is embeded in an article using the Content plugin, this option will prepend the content title to the subject;
Description
{gdata id=|MjEDEWQ8xxo|}
A checkbox (check box, tickbox, tick box) is a Graphical control element that permits the user to make a choice, i.e. a choice between one of two or more possible options. For mutually exclusive options, use Radio button instead.
Checkboxes are often shown on the screen as a square box that can contain white space (for false) or a tick mark or × (for true), as shown ( ☐ or ☑, respectively). A caption describing the meaning of the checkbox is normally shown adjacent to the checkbox. Inverting the state of a checkbox is done by clicking the mouse on the box, or the caption, or by using a keyboard shortcut, such as the space bar.
Requirement
- Have watched the Form Fields -> Basic Features screencast;
Copyright © 2018 IdealExtensions.com. All Rights Reserved.
We may collect your IP address and your browser's User Agent string while using our site for security reasons and deriving aggregate information (analytics). This information is retained for a minimum of 1 and a maximum of 24 months.