Contact Enhanced Documentation
These guidelines are intended as a work-in-progress and will continue to be informed by feedback from users and staff members. Ideas about and suggestions for improvement of the document can be forwarded using our forum and email form. Keep in mind that the screencasts here are to demonstrate a specific feature and may look different in your site, specially due to template styling. Some users have helped with screencasts, so if you made a screencast or a tutorial, you can post on the forum or send it to us by email.
Getting Started
This is a short instruction on how to install Contact Enhanced extension in your Joomla installation.
To install the Contact Enhanced extension use the Extensions Installer in the Joomla administration. Go to Extensions » Install/Uninstall.
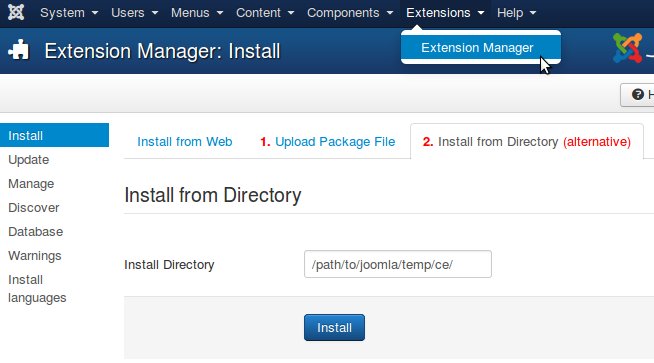
When you are facing an error during installation, it is highly recommended to try to Install from directory:
- Download the latest Contact Enhanced (CE) version and unpack all CE files to a directory on your computer;
- Using FTP, upload this directory to the /tmp directory of your Joomla installation on your webserver/
- Go to the extensions installer in the Joomla administration, use the "Install from Directory" option to set the directory of your uploaded CE files.
- Click on the Install button and Joomla will install it from the given directory.
Requirements
- Joomla 2.5+
- PHP 5.2.7+
- PHPs GD extension (enabled by default in PHP 5.0+)
- PHPs SimpleXML extension (enabled by default in PHP 5.0+)
- PHPs DOM extension (enabled by default in PHP 5.0+)
- PHPs allow_url_fopen support (enabled by default in PHP 5.0+)
- Mod_rewrite for Apache for search engine friendly links (enabled by default in most web servers)
Installation Video for Joomla 1.5
{gdata id=|WJCebiuR-cM|}
Contact Enhanced is very easy to set up, but because it has so many options it might bit a bit confusing for beginners, so a Cheat Sheet* for the basic usage was created. Keep reading it!
- Installation:
- Purchase/license and download the latest version of Contact Enhanced (CE);
- Select Extensions → Extension Manager from the drop-down menu of the Joomla! Administrator Panel. Then select the Install menu item in the Extension manager screen that appears.
- Navigate to the Contact Enhanced zip file, select and install as you would any other Joomla! extension;
- CE Component Configuration:
- Go to Components→ Contact Enhanced;
- Click on the Options button on the toolbar to change the Component's Configuration according to your needs. Each label has a tooltip to help you understand what each feature does. These settings can be overridden by the Contact's Options and the Menu Options;
- Category Configuration:
- Click on the Categories and Select New;
- Fill in minimal info to set up a default category and Save;
- If you need to display forms with different fields you'll need to create a different category for each different form (then assign a contact and form fields to that new category);
- Form Fields:
- You can add as many Form Fields as you like;
- The Name, Email, Subject and Recipient Form Field types have special behaviors;
- Every Form MUST have the Name and Email Form Field types; If you don't want to display them, then set the value and hide them;
- Read more information regarding the Form Fields in the Documentation Page.
- Contact (form) Configuration:
- Click on the Contacts tab;
- Select Contacts and then "New";
- Under Publishing Info fill set:
- Name. The full name of the Contact. Name can actually be a function or department, not a specific human being;
- Alias. The internal name of the item, also used in the URL when SEF is activated. Normally, you can leave this blank and Joomla! will fill in a default value. The default value is the Title or Name in lower case and with dashes instead of spaces. You may enter the Alias manually. The Alias should consist of lowercase letters and hyphens (-). No blank spaces or underscores are allowed. Note: If the title consists of non-Latin characters, the Alias will default to the current date and time, for example "2009-02-11-17-54-38".
- Linked to User. Select the User, if any, that this Contact is linked to from the drop-down list box. This allows you to link this Contact's information to a registered Joomla! User. If this Contact is not linked to a User, select "-No User-".
- Category. The Category this item belongs to.
- Under Contact Details slider set:
- Image. Image to display for this Contact. Select an image file from the drop-down list box. This lists images in the 'images/stories' folder. Images can be uploaded using the Media Manager.
- Contact's Position: The Contact's current position.
- E-mail. Assuming you selected "No User" earlier, you must enter an email address or an alias to which filled forms will be sent. Do it.
- Keep in mind that if you link to an user it will use the user's email address, even if you enter an email here;
- Address. The Contact's street address.
- City or Suburb. The Contact's town or suburb.
- State or Province. The Contact's state or county.
- Postal / ZIP Code. The Contact's postal code.
- Country. The Contact's country.
- Fill in other info as you wish; for a simple form you don't need to complete any of the other fill in fields on the left.
- Google Maps configuration (optional) - GMaps slider:
- Google Maps (GMaps) works with the address info you fill in. So fill in the next 4 fields: Street Address, Town/Suburb, State/County, and Postal Code/ZIP.
- To set Google Maps click on Maps slider and click on "Locate in map". If it does not find the address correctly then you may need to mess with the Address fields and Apply and try again OR drag the marker (pin) until you point it to the correct location;
- Click on Display Options (optional):
- Show Contact details: Allows you to display the contact details in different places. Sidebar is good unless you have a really narrow page.
- Show Map: Choose whether and where you want to display Google Maps in order to suit your preferences;
- Change the options selections to meet your needs; none really must be changed.
- Click on "Contact Form" slider (optional):
- Record messages: Whether you want to record the emails sent to this contact in the database;
- Show sidebar: Change to Right or Left if you want the contact info to display in the sidebar;
- Nothing else must be change for the form to work, so click Save;
- Menu Configuration:
- Go to Menus --> Menu Manager and select the Menu where you want the form to display.
- Select New button from the toolbar
- Menu Item Type: Contact Enhanced --> Single Contact Form (or other menu item type);
- Give it a Menu Title and set Parent Item.
- Contact Display Options: you can override most Contact Details configuration options;
- Page Display Options: Set a Page Title and a heading;
- Select Save;
- Clean the Joomla and your browser's cache and go to your website and check it out. It should be good to go, but you can also configure the plugins included in the package:
- Captcha Configuration:
- In the Component Configuration (item #2) set the Captcha option to your favorite Joomla core plugin captcha;
- Contact Enhanced comes with a core captcha plugin called SecurImage. It is very customizable and if you want to use it, go to Extensions --> Plugin Manager --> Captcha - SecurImage and change the options as you wish;
- CE Feedback Plugin Configuration:
- Contact Enhanced Plus and Pro packages includes a vertical Feedback tab/button that can be displayed on the left/right of your website. To configure this button, select "System - Cefeedback";
- Make changes as necessary and save the changes;
- Please go to Plugin: CE Feedback Site Tab to read more about it;
* A cheat sheet or crib sheet is a concise set of notes used for quick reference;
This is a tutorial on how to update the Contact Enhanced extension without uninstalling and reinstalling the component.
Update Contact Enhanced
Simply choose one of three different distributions of the Contact Enhanced. The Contact Enhanced Lite, Contact Enhanced Plus or Contact Enhanced Pro installation package, including all available plugins and modules. All packages include the back-end modules.
Now follow these steps to update your Contact Enhanced:
- First of all make a backup of your site (files and database), so you can recover it any time;
- Download the latest Contact Enhanced version (one of the distributions from above);
- Extract (unzip) the downloaded zip file. In this file there's a Contact Enhanced version for your Joomla version;
- Go to the extensions installer in the Joomla! administration, pick the downloaded Contact Enhanced package and click on Upload File & Install.
That's it! Now the Contact Enhanced extension, all language files and all bundled modules and plugins are updated to the latest version...
Keep in mind that any modifications to the files (PHP, CSS, Images, language, etc) may be lost. Therefore we recommend to create a full backup before the upgrade. If you want to change HTML we recommend to use Joomla's core HTML template override and use Language overrides to change the language.
When you've finished the update, clear your browser cache and the Joomla cache. To clear the Joomla cache go to the Joomla administration » Tools » Clean Cache.
If you are facing this error during installation: Fatal error: Maximum execution time of 30 seconds exceeded in [file/path.php] on line [line number] you may try to install the component from a directory as described in the Installation article.
Upgrade from 2.5 to 3.x procedure
First upgrade your Joomla 2.5 to Joomla 3.x or newer, then follow the Update Contact Enhanced steps mentioned above.
Contact Enhanced has maps integration with Google Maps API (requires billing information) and with Leaflet to show a map based on the contact address. If you have a Contact Enhanced PRO subscription you can also use the Ideal Store Locator plugin, which has integration with Google Maps API only.
Features:
- Easily display latitude and longitude of address;
- Balloon (Info Window) content: By default the Contact's address and image are displayed in the balloon, but you can add any text to the balloon using a contact Extra Contact Field, including HTML .
- Customize the Marker icon;
Google Maps API Features Only:
- Google Maps directions: The Directions Search field is displayed inside the balloon (info window) and you can choose whether to display the directions before or after the map;
- Choose a language: By default Google Maps API will use the Browser's language, but you can change it so it will display the current Joomla language OR you can manually set the Maps language;
- Show/Hide Navigation Control;
- Show/Hide Map Type Control;
- Choose the default Map Type. Options: Roadmap, Satellite; Hybrid, Terrain;
- Using GMaps API version 3, which was designed with Mobile devices in mind, therefore loads faster;
- Customizable Map Style: As of version 3.3.7 of Contact Enhanced and version 3 of the Google Maps API custom styles can now be applied to maps. This allows you to pick a style that matches the theme of their website.
You can create your own style using the Google Styled Maps Wizard and copy the JSON code to this field OR use an existing map from snazzymaps.com
Google Maps API requires a Key and Billing information
An API Key to use Google Maps API is required. Follow these steps to get an API key:
- Go to the Google Developers Console.
- Create or select a project.
- Click Continue to enable the API and any related services.
- On the Credentials page, get a Browser key (and set the API Credentials).
Note: If you have an existing Browser key, you may use that key. - To prevent quota theft, secure your API key following these best practices.
- Make sure to enable Google Places API Web Service, Google Maps Roads API, Google Maps JavaScript API , Google Maps Geocoding API , Google Maps Directions API , Google Maps Distance Matrix API , Google Maps Geolocation API ;
- Enable billing. See Usage Limits for more information.
Google Maps Platform
On May 2nd 2018 Google announced important changes, including a new name - Google Maps Platform, which they claim to be a simplified product structure, pay as you go pricing for all, and more. Please take a few minutes to review the announcement to familiarize yourself with the changes.
We would like to highlight a few Google Maps updates that may impact your implementation. Beginning June 11th, Google is launching a new pricing plan and providing all users access to support. They’ll continue to offer a free tier — all developers will receive $200 of free monthly usage of core products. In addition, this change will require you to enable billing and associate it with all of your Google Maps Platform projects.
How does this affect your current projects? Check on https://
Screenshots
Contact Enhanced has maps integration with Google Maps API (requires billing information) and with Leaflet to show a map based on the contact address. If you have a Contact Enhanced PRO subscription you can also use the Ideal Store Locator plugin, which has integration with Google Maps API only.
What's Leaflet?
Leaflet is the leading open-source JavaScript library for mobile-friendly interactive maps. Leaflet is provider-agnostic, meaning that it doesn’t enforce a particular choice of providers for tiles. Leaflet doesn’t even contain a single provider-specific line of code, so you’re free to use other providers if you need to.
Tile Providers
Some Tile providers are free to use. This doesn't mean no limits apply, you should always check each of the provider's Terms and Conditions before using these layers for anything serious. There are some paid providers with a free quota. For example Mapbox.com provides 50,000 map views for free. Most free providers, if not all, get the map data from https://openstreetmap.org. OpenStreetMap is a free, editable map of the whole world that is being built by volunteers largely from scratch and released with an open-content license.
How to use
- Go to Components → Contact Enhanced → Options and under the Map tab set Map Script to Leaflet.
- Choose a Map Tiles provider and configure it accordingly;
Contact Enhanced Contacts now have many more Contact Field options, which is using Joomla's com_fields component.
How to access:
Go to Components → Contact Enhanced → Contacts, then you'll see two new menu items called:
- Contact Fields
- Contact Field Groups
{gdata id=|qXB5zACc5Ms|}This Screencast shows how to edit the Component Parameters (Options in Joomla 2.5). Remember that all Component Parameters are overridden by the Menu Item parameters. This feature allows you to have different configurations for each form;
This feature is deprecated.
Please use Contact Fields instead.{gdata title=|Missing screencast| app=|none|}
How to Access
Select Components → Contact Enhanced → Custom Values from the drop-down menu on the back-end of your Joomla! installation. This option is only available if you have a SQL Form Field type.
Description
The Form Fields Manager screen allows you to create advanced Form Fields using the SQL Form Field type, which displays a Select dropdown with values from the database. Some users might want to add the values to a new database table, that's why we've created the Custom Values;
Details
Text: The text the user will see in the dropdown select list (required);
- Value: The text that you will get in the email (required);
Type: You can enter any value to help you to keep things organized;
Category: You can use this field as you wish; You can enter a value or select one from the list; IMPORTANT: This is not necessary related to the Contact Enhanced Categories;
Navigate to the Contact Enhanced Manager. To add a new Contact, press the "New" icon in the toolbar. To edit an existing Contact, click on the Contact's Name or click the Contact's checkbox and then click on the "Edit" icon in the toolbar.
Description
This is where you can add a Contact or edit an existing Contact. Contact Enhanced allow you to list people on your web site. They also allow users to send e-mails to those people.
Navigate to the Form Fields Manager. To add a new Form Field, press the "New" icon in the toolbar. To edit an existing Form Field, click on the Form Field's Name or click the Form Field's checkbox and then click on the "Edit" icon in the toolbar.
Description
This is where you can add a Form Field or edit an existing one. Contact Enhanced allows you to list Form Fields on your web site's contact forms. Contact Enhaced has the ability to allow you (site administrator) to assign custom fields to a contact category. Therefore you have to create a category before you create a custom field. Your users will be able to fill that custom field when they submit the form.
Description
In Contact Enhanced → Contacts → Edit Contact you have the Fields: First Sort Field, Second Sort Field and Third Sort Field, which allow you to order the contacts in a List view by them. This is very useful if you want to order your contacts in a category list by Last name.
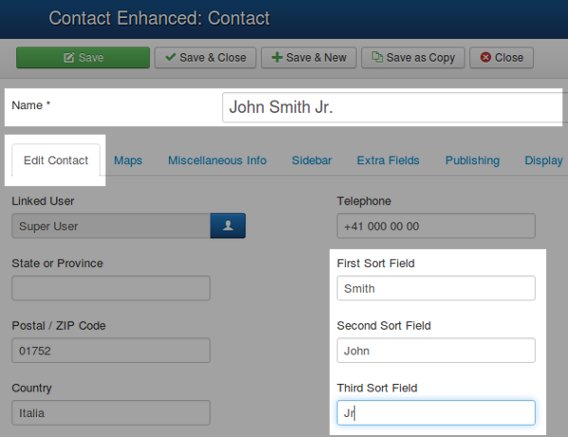
Usage
If ordering is set to Name (in the Component options, under the List tab), it will use these fields to sort the Contacts in the Category list. If they are blank it will use the Name field.Useful when you What to sort the list by Last name, but want to display the first name in the Category list view. For example, your Contact Name is John Smith, but you want to sort by last name, then in the "First Sort Field" you ad Smith and in the "Second Sort Field" you add John.
How to access
Select Components → Contact Enhanced → Form Fields from the drop-down menu on the back-end of your Joomla! installation.
Description
Contact Enhaced has the ability to allow you (site administrator) to assign custom fields to a contact category. Therefore you have to create a category before you create a custom field. Your users will be able to fill that custom field when they submit the form.
Select Components → Contact Enhanced → Contacts from the drop-down menu on the back-end of your Joomla! installation.
Description
The Contact Enhanced Manager screen allows you to add contact information to your Joomla! site. You can enter information such as name, address, phone and e-mail. You can also link contacts to registered users. Afterwards, you can use the Menu Manager to create front-end links to the the contacts.
Description
A QR code (abbreviated from Quick Response code) is a specific matrix barcode (or two-dimensional code) that is readable by dedicated QR barcode readers, camera telephones, and to a less common extent, computers with webcams. The code consists of black modules arranged in a square pattern on a white background. The information encoded may be text, URL, or other data. Wikipedia
Description
Option to allow an usergroup to edit a contact details without back-end (administrator) access. Only the user linked to a contact can edit the contact;
The General Data Protection Regulation (GDPR) (EU) 2016/679 is a regulation in EU law on data protection and privacy for all individuals within the European Union. It addresses the export of personal data outside the EU. The GDPR aims primarily to give control to citizens and residents over their personal data and to simplify the regulatory environment for international business by unifying the regulation within the EU. It was adopted on 27 April 2016. It becomes enforceable on 25 May 2018, after a two-year transition period.
This is an an extensive description or list on how to comply with GDPR. For more information please read the official website.
Are you tired or having to type the same answer over and over again? If so, use the Contact Enhanced Canned Answers feature.
Usage
- Go to Components → Contact Enhanced → Recorded Messages
- Click on a message, then click on the Reply button.
- You'll see a Canned Answers link. When you click on it you will be able to add New Canned Answer;
- After you've added your Canned Answers you can click on them in order to use them.
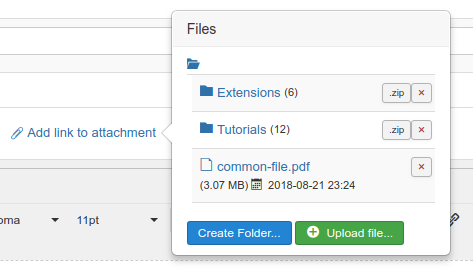
Your Customer Service staff most likely reply to the same or similar questions very frequently, that's why we've implemented the Canned Answers, however it solved only part of the problem. Sometimes a support reply includes a file and uploading the same file multiple times can be tiring and time consuming. Therefore we've implemented a different attachment method. With our File link attachments in reply message feature your customer service staff will only have to upload the file once and add the link to the email. They can also add a link to an entire folder, which the user will download as a zip file.
Form Fields
Contact Enhanced has the ability to allow webmasters to assign Form Fields to contact forms. Form Fields offer a lot of flexibility that allows you to create more a simple contact form.
{gdata id=|F-fERcoMN2U|}
Description
Form Fields allows you to extend the functionality of Contact Enhanced.
Requirement
- Have created one or more Contact Enhanced categories;
important Information
- You can add as many Form Fields as you'd like;
- The Name, Email, Subject and Recipient Form Field types have special behaviors;
- Every Form MUST have the Name and Email Form Field types; If you don't want to display them, then set the value and hide them;
- Read more information regarding the Form Fields in the Documentation Page.
Usage
Select Components → Contact Enhanced → Form Fields from the drop-down menu of the Joomla! Administrator Panel.
To add a new Form Field, press the "New" icon in the toolbar. To edit an existing Form Field, click on the Form Field's Name OR click the Form Field's checkbox and then click on the "Edit" icon in the toolbar.
Description
This form field allows your user to subscribe to one or several Acymailing Lists.
Requirements - Have configured at least one list in AcyMailing
- Have watched the Form Fields -> Basic Features screencast;
Description
Creates an auto complete Form Field where you can search content from any table in the database.
Requirement
- Have watched the Form Fields -> Basic Features screencast.
Usage
Select Components → Contact Enhanced → Form Fields from the drop-down menu on the back-end of your Joomla! installation, then Select AutoComplete from the Field Type select list;
Choose a category for your Form Field, then Save the changes.
Add a SQL query to the value. The SQL Query must return one column only and the column name OR alias must be "value". Use {selectresult} as the text to search for
Code Example
SELECT title AS value
FROM #__content
WHERE state=1
AND title LIKE '%{selectresult}%'
ORDER BY title ASC
Description
{gdata id=|hp6n36Bclo4|} With Campaign Monitor Form Field your can display your CampaignMonitor lists so your users can subscribe themselves when they send submit the Contact form.
Requirements
- Have watched the Form Fields -> Basic Features screencast;
- You have to sign up to Campaign Monitor and add the API and ClientID to the Custom Field Parameters, which are only displayed after you save the form;
- Campaign Monitor API requires Apache cURL module to be enabled [1];
Chained Selects lets you "chain" multiple select lists together so that the selection in a "parent" list can tailor the options available in a "child" list. Chained Selects supports unlimited unlimited number of "chains" in in a form.
In order to Create a chain select list you have to use the SQL Form Field and the fields will be loaded using AJAX JSON Calls.
The first option of a Chain select list can also be a Radio list.
Description
{gdata id=|MjEDEWQ8xxo|}
A checkbox (check box, tickbox, tick box) is a Graphical control element that permits the user to make a choice, i.e. a choice between one of two or more possible options. For mutually exclusive options, use Radio button instead.
Checkboxes are often shown on the screen as a square box that can contain white space (for false) or a tick mark or × (for true), as shown ( ☐ or ☑, respectively). A caption describing the meaning of the checkbox is normally shown adjacent to the checkbox. Inverting the state of a checkbox is done by clicking the mouse on the box, or the caption, or by using a keyboard shortcut, such as the space bar.
Requirement
- Have watched the Form Fields -> Basic Features screencast;
Description
With the Constant Contact Form Field integration, you can now sign up any user to a Constant Contact list with a few simple steps. Constant Contact is a field and does not display Constant Contact fields, so additional CE fields need to be assigned to the category that match Constant Contact (Surname, Name, Email, City and State). This way Contact Enhanced will submit the fields to Constant Contact;
Requirements
- Have a Constant Contact account and at least one list created
- Have a Mashery account (explained later);
Description
You can add any CSS code to a page where a Contact Enhanced form is published. Please do not confuse this Custom Field with the Attributes Field of every Custom Field where you can add the style="" attribute.
Requirement
- Have watched the Form Fields -> Basic Features screencast;
- Some CSS knowledge;
- FireBug might help in this task; (optional);


You can display HTML anywhere in the form using the Free Text Form Field type;
How to access it:
- Go to Components →Contact Enhanced → Form Fields;
- Create a new Form Field, set the Type to Free Text and Save;
- Add any value you want to the Value, including HTML content and Save.
Tutorial (Joomla 1.5)
{gdata id=|bTBFtCUnsqU|}
Value:
Any text
The value will be displayed in the email message;
Advanced:
If you want to integrate Contact Enhanced with other systems you just you can send variables in the URL that will populate the fields;
You will just have to add alias=example to the URL, where alias is the Form Field alias. For example we'll prefill the Subject and website fields in our Support Contact Form, take a look:

Description
You can add any JavaScript code to a page where a Contact Enhanced form is published. Please do not confuse this Custom Field with the Attributes Field of every Custom Field where you can add html attributes such as onblur="", onchange="", cols="", rows="" ,....
Requirement
- Have watched the Form Fields -> Basic Features screencast;
- Some Javascript knowledge;
- FireBug might help in this task; (optional);
{gdata id=|-KTWd1Esz4I|} With MailChimp Form Field your can display your MailChimp lists so your users can subscribe themselves when they send submit the Contact form.
Description
Contact Enhanced allows your user to upload Multiple Files at once, with multiple file selection, progress bars and validation. The files are uploaded via Ajax, so the form will be processed much faster (version 3.2 and newer).
Requirement
- Have watched the Form Fields -> Basic Features screencast;
- In Joomla 3.2 and newer, jQuery and Bootstrap will be loaded (automatically);
Value:
Range separated by - and Values separeted by |
Value example:
1-10|11-20
Output:
{gdata id=|6e6UREuTOcY|}
Description
You can break a contact form into multiple pages. This will allow you to collect data in a contact form over multiple pages (steps) instead of all in one.

Description
You can add PHP code to a page where a Contact Enhanced form is published.
Requirement
- Have watched the Form Fields -> Basic Features screencast;
- Some PHP knowledge;
- FireBug (optional) might help in this task, in case you the PHP fields adds javascript code as well;
<input> elements of type radio are generally used in radio groups—collections of radio buttons describing a set of related options. Only one radio button in a given group can be selected at the same time. Radio buttons are typically rendered as small circles, which are filled or highlighted when selected.
Example
A select list (also known as drop-down list) is a form element that allows the user to select an option from a range of options.
Example:
Usage:
Go to Components → Contact Enhanced → Form Fields, click on the New button, then set the Form Field Type to Select List.
Edit Custom Field Value by adding a new row for each new option. The first option is the field's value and the second is the label.
Value:
email::Description separeted by |
Value example:
sales@mycompany.com::Sales Department |
support@mycompany.com::Support Department
Output:
{gdata id=|4g-KZdpjb1g|}
Value:
- Blank;
- Some text or Values separated by | (if you want to display as a select list)
- If the Form Field is set to hide you can add any Form Field input in the Subject by adding the following syntax {ALIAS} where ALIAS is the Form Field ALIAS; The {ALIAS} cannot be a checkbox Form Field;
Subject Form Field Parameters
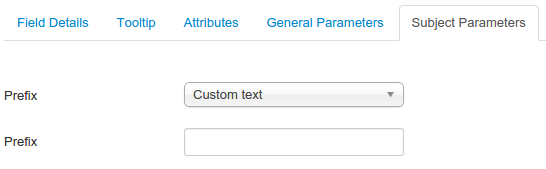
With the Subject Form Field type you have four options of prefix, which will be added after the field is submitted:
- None: No prefix will be added;
- Custom Text: You can add your custom text for the prefix. You can also add any Form Field input {name}, {email}, {user_ip} or any other form field with the following syntax {ALIAS} where ALIAS is the Form Field ALIAS; The {ALIAS} cannot be a checkbox;
- Site Name: Will prepend the site name to the subject;
- Current Content Title: In case the form is embeded in an article using the Content plugin, this option will prepend the content title to the subject;
Description
How to display Custom Fields in multiple languages;
Requirement
- Have Joomla Multi-lingual plugins enabled;
- Have created the language content in Joomla! Admin -> Extensions -> Language Manager;
- Joomla 1.6 and newer;
Usage
When you first install Contact Enhanced, all Form Fields are set to ALL languages. So first, you need to copy the current Form Fields to one of the languages.
Batch Process:
Go to Components -> Contact Enhanced -> Form fields, Select ALL Fields you need in multiple Languages, then click on the Batch button and move the fields to the new language.
One by one:
Go to Components -> Contact Enhanced -> Form fields, open the original form field set the language to English (or another language) under the Publishing Info slider and then change the name of the field for the new language and set the language to the chosen one and hit Save as a Copy and you are done.
Joomla 1.5:
In Joomla 1.5 it is a bit more complicated because it requires you to use Joom!Fish and it cannot translate multiple database tables per component. Please read this forum post.
Description
You can display one or more Custom Fields in the Components → Contact Enhanced →Recorded Messages (back-end)list.
Requirement
- Contact Enhanced 3.2+;
Usage
Select Components → Contact Enhanced → Form Fields from the drop-down menu on the back-end of your Joomla! installation. Then under the General Parameters tab set Show on Recorded Messages to Show;
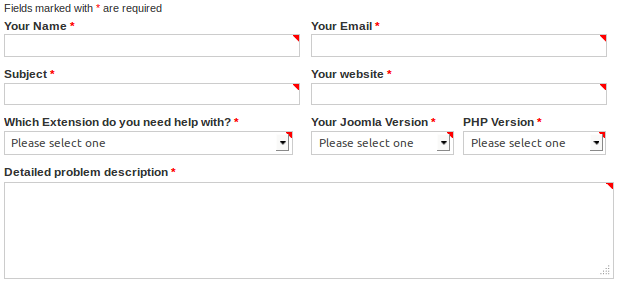
Description
How to display Form Fields in multiple columns.
Requirement
- Have setup and Category and Contact;
- Have watched the Form Fields -> Basic Features screencast;
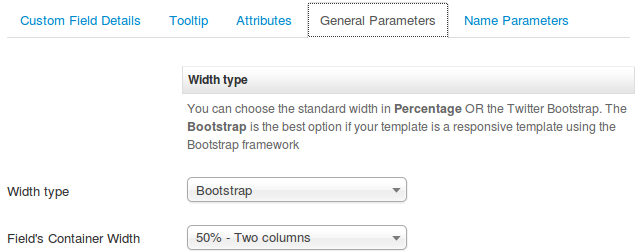
Usage
Go to Components -> Contact Enhanced -> Form Fields.
1. Edit each Custom Field and under the General Parameters tab set the Width type to either Bootstrap OR Percentage.
Set to Bootstrap if your template is compatible with Bootstrap javascript library and if you want your form to be responsive.
2. Adjust the Field's Container Width to the desired number of columns.
You have to perform steps 1 and 2 for each custom field.
Keep in mind that the field order will be from left to right (top->bottom), so you can have multiple columns. Please see screenshot below for example.
You might also create a CSS Custom Field and add the CSS rule below to make the fields take the full width;
.ce-cf-container{width:95%}Screenshot
Customizing your forms
Unlock more leads by capturing partial entries from your forms. Easily follow up with interested leads and turn them into loyal customers.
How many leads are you losing when visitors don’t finish your forms?
Description
When you add a "Create Contact" menu item for Contact Enhanced you can select whether your contacts are automatically registered as a Joomla user.
Requirement
- Contact Enhanced 3.2.3+ FULL Package;
- Have read the Create Contact Menu item.
Usage
When you are creating a menu item using Joomla Menu options.
- Click on "Contact Display Options".
- The top option allows you to choose whether a user is automatically registered as a Joomla user when the contact form is saved.
- No is the default option, set to Yes if you do want registration to take place.
- Click Save and Close when done.
Then go to the Extension → Plugin Manager, Edit the User - CE Contact Creator plugin, and under the Advanced Tab set which fields you want to synchronize.
Description
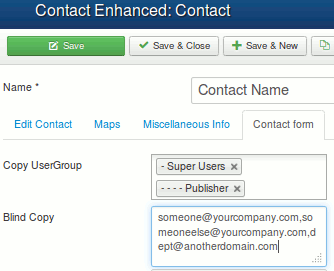
Sometimes your Contact Enhanced →Contact actually represents an entire department or user group, so you need to send emails to several email addresses when the Contact Form is submitted. Keep reading to find out how this can be done.
Requirement
- Have set up at least one category, one contact;
Description
With Contact Enhanced SalesForce integration you can capture contact information from users and automatically generate new leads in salesforce.com, enabling you to respond in real-time to customer requests.
Requirement
- All Form Fields Aliases must be the same as SalesForce's WebToLead field names;

Usage
1. Log in to SalesForce.com, then click on [Your Name] → Setup → Customize → Leads → Web-to-Lead, then Click on Generate, find your OID and copy the value;
2. Select Components → Contact Enhanced → Contacts from the drop-down menu on the back-end of your Joomla! installation; Then edit an existing contact or create a new one;
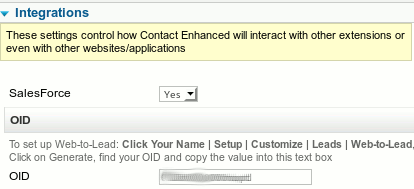
3. Under the Integrations tab set the "" to Yes and enter the OID you've copied from SalesForce.com;
4. Make sure the Custom Field's Aliases matches SalesForce field's names, except for First Name and Last Name, which you must use the Name and Surname Custom Field types, which do not let you change the Alias;
Description
You can easily change the field size in any Custom Field (types: Text, Textarea, selectlist,...)
Requirements
- Have watched the Custom Fields -> Basic Features screencast;
How to:
There are three ways to accomplish this:
{gdata title=|Missing screencast| app=|none|}
Definition
HTML anchor < a > tag is also very useful for creating bookmark links. HTML bookmark tag links help in linking the different parts of a single HTML document. HTML bookmark tag link navigates the web page to the targeted location of same or different web page. name attribute of HTML anchor <a> tag provides the feature of bookmark links. In Contact Enhanced there are the following bookmark tags:
<a name="sidebar" ></a>
<a name="map" ></a>
<a name="form" ></a>
Usage
You can navigate to this bookmark by using href="#form" in another HTML anchor <a> tag link, the code below works within the same Contact Enhanced page:
<a href="#form">Go to Contact Form</a>
If you want to open the bookmark of another web page then you have to specify the page name also. For example you want to add a link a link to the Contact Enhanced form inside a content Article, then you can add the target bookmark link to your content article as following:
<a href="/http://yoursite.com/uri_to_the_contact_enhanced_contact_form#form">
Go to Contact Form</a>
{gdata title=|Missing screencast| app=|none|}
Contact Enhanced (CE) tries to inherit most of your template's style. However if it does not fit your needs you can add a class to your css file; Follow these simple steps:
Before you try to create something a bit more advanced you have to understand how Contact Enhanced works, therefore I suggest you to create a form and test most of its features before you continue; Also, please take a look at the online documentation.
Read more: How to display a hidden field when the user clicks on a specific checkbox OR radiobox?
Select Components → Contact Enhanced from the drop-down menu on the back-end of your Joomla! then click the Parameters (Options) button and set Show user info to No;
Attributes provide additional information about HTML elements, this values can be used in the Custom Fields Attributes field.
- HTML elements can have attributes
- Attributes provide additional information about an element
- Attributes are always specified in the start tag
- Attributes come in name/value pairs like: name="value"
Description
HTML templates gives you great flexibility:
- All sent emails can be delivered in HTML format;
- Very customizable: You can choose which information to send;
- You can have different templates for each contact, by changing the options in the Contact Edit page OR in the Menu Item options;
- You can have separate templates for the Contact email and for the user copy;
Requirement
- Have created a contact and a contact category; If you didn't get this far, please read the Cheat Sheet.
- In case you are configuring the "Edit Notification" email template you also need to have configured the Front-end editing feature. Please read the Front-end editing article.
Usage
Description
Makes a field required based on a radio button selection.
Requirements
- Have created a Radio Button Form Field with the options you need;
- Create a Javascript Form Field;
Read more: How to make required fields based on a radiobox selection?
Description
You can configure Contact Enhanced to display a Registration Form, however please keep in mind that this is not the main purpose of Contact Enhanced, therefore the only Form Fields recorded on the User's database table are name, username, -mail and password.
This is something a few users ask for, but we do not encourage/recommend using Contact Enhanced as a registration form. There are many registrations extensions available for Joomla at JED.
If you are translating for Joomla 1.6 or newer we encourage you to start using Transifex.net. Please read this article:
Translate Contact Enhanced Using Transifex
Contact Enhanced is already translated into some languages, if it is not translated into your language, you can translate it yourself and it is not hard to do. There are 2 language files to create to translate the component, one for the frontend, one for the backend.
These files have to be named following the convention (see a list with the most common COUNTRY-CODE):
[language-code]-[COUNTRY-CODE].com_contact_enhanced.ini
For example: en-GB.com_contact_enhanced.ini for english, pt-BR.com_contact_enhanced.ini for Brazilian Portuguese.
They have to be placed in the folder corresponding to the language and the frontend/admin part, for example:
{gdata title=|Missing screencast| app=|none|}
You can set each form a different Custom Redirect.
Select a contact from Components -> Contact Enhanced -> Contacts, then set Custom redirect under the Advanced Parameters slider;![]()
![]() Select a contact from Components -> Contact Enhanced -> Contacts, then set Redirect under the Contact Form slider;
Select a contact from Components -> Contact Enhanced -> Contacts, then set Redirect under the Contact Form slider;
In the Custom Redirect paramenter you have to write: index.php?option=com_content&view=article&task=view&id=0000, Change 0000 for the article id that can be found at article manager, or you can add any URL starting with http://
Please note that if you use an internal URL starting with index.php the Contact Enhanced will set a "Thank you note" in the System Message, however if you add an internal URL starting with http:// the System Message will not be set.
Menu items
Description
Contact Enhanced can be set up to add contacts through the front-end; The Contact added will be linked to the current logged in username and only one contact is allowed to be created per font-end users, so if the user clicks on the Create Contact link twice he will get the edit contact form in the second time.
Requirement
- Contact Enhanced 3.2+;
- Have created at least one Contact Enhanced Category;
Description
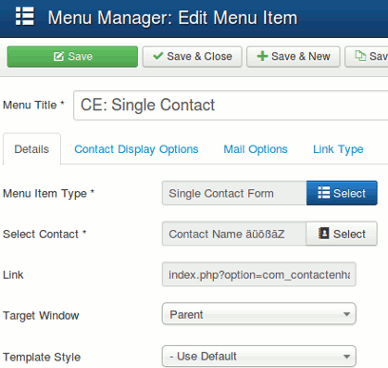
Used to show a Single Contact. Settings include: Contact Details, Contact Form, presentation(slider, tabs, plain view), and more..
Requirement
- Have read the Cheat Sheet;
- Have set up at least one category, one contact and Form Fields;
Description
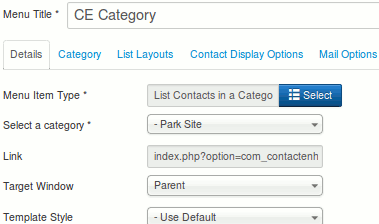
Used to show contacts belonging to a specific Category in a list layout. Settings include: Category Options, List Options, Contact Details, Contact Form and more...
Requirement
- Have read the Cheat Sheet;
- Have set up at least one category, one or more contacts;
Description
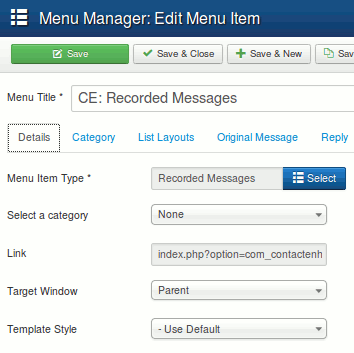
Used to show the Recorded Messages (Submitted forms) sent from the current logged in user (front-end).
Requirement
- Have set up at least one category, one or more contacts;
Using plugins and modules
Ideal Store Locator Address Search Module displays a search box and allows users to search for zip codes or locations. This way you can display the search module on a different page of the Ideal Store Locator Plugin page. It will set the first result as the user's "home" location on the Ideal Store Locator map.
The Contact Enhanced plugin for OSMap enables you to show your Contacts and Contact Enhanced Categories into the OSMap site map.
The Contact Enhanced plugin for SharpSpring enables you to integrate Contact Enhanced with SharpSpring. SharpSpring is a Complete Sales & Marketing Platform. SharpSpring marketing automation helps marketers drive more leads, convert more leads to sales, and optimize marketing ROI
As of Joomla 3.9, Joomla introduced an action logging system. This system provides an infrastructure to create an audit log of activity performed on a website and can be fine-tuned to the site admin's preferences.
Contact Enhanced PRO Package (version 3.9.1 and newer) has a plugin to integrate with Joomla's User Actions Log Component and it is very simple to enable the integration. Just follow these simple two steps:
GDPR compliance requires that you be reachable and responsive to user requests for data that you’ve collected on them either to view or delete. You can create a simple consent withdrawal/request to view form on your Privacy Policy page.
Contact Enhanced Cron Plugin, also known as Cronjob Scheduler, allows you to run some tasks that are automatically triggered on a schedule you define.
The available tasks are:
- Delete old attachments;
- Delete old Recorded Messages
- Send reports to selected email address with the Subject of the latest submitted forms
- Send partial abandoned forms to form recipient(s).
- Synchronize contacts with another Joomla installation.
Description
 The Contact Enhanced Signature Pad plugin is a flexible plugin that allows you to easily add a signature pad to a Contact Enhanced form. The Signature Pad has two modes: TypeIt and DrawIt. In TypeIt mode the user’s signature is automatically generated as HTML text, styled with @font-face, from the input field where they type their name. In DrawIt mode the user is able to draw their signature on the canvas element.

Description
Contact Enhanced Alpha Index Module, also known as Alphabetical Search, displays Alphabetic seach links. It will filter contacts starting with the respective letter.
Requirements
- Contact Enhanced PRO package installed;
- Create a Contact Enhanced -> Search menu item;
Description
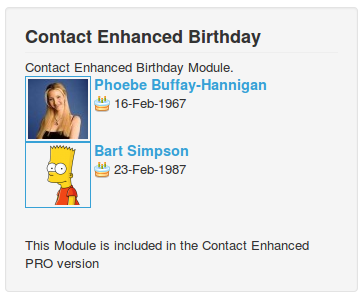
Contact Enhanced Birthday Module displays the upcomming and past (optional) contact's birthdays.
Requirements
- Contact Enhanced PRO package installed;
- Contact Enhanced Contacts have a birthday field. Enter the birthday in this field in order to show the contact's birth in the module;
Description
Contact Enhanced already gives you a lot of flexibility to display your Contact page with the Single Contact Form menu item, however sometimes you might need a greater flexibility and add CE Form inside an article or inside another component that is compatible with Content plugins.
Requirement
- Have set up at least one category, one or more contacts;
- Enable the Content - Contact Enhanced Form plugin;
- Enable the Button - Contact Enhanced Form plugin;
How To Access
To create a new Recorded Messages Menu Item:
- Select Extensions→ Plugin manager from the drop-down menu on the back-end of your Joomla! installation;
- Search for the Contact Enhanced and enabled the Button and Content plugins;
Usage
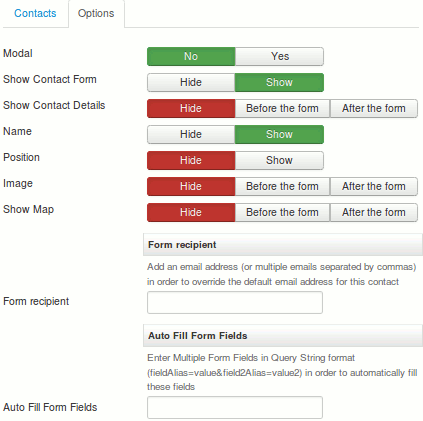
The Button - Contact Enhanced Form plugin helps you to add the correct syntax. When it is enabled you should see this button  below the content editor, then click on it to open a modal window with the options (see image on the right). {loadcontact disabled}
Choose the options you want , then under the Contacts tab select which Contact you want to display in the form;
If you do not want to enable the Editor Button, then you can manually enter the following syntax inside the Joomla article:
{loadcontact id=|ID| }
You just have to change the ID for your contact id;
You can also add the Map or display in a modal window and a few additional options, Contact details and Contact image, by using this code:
{loadcontact id=|ID| recipient=|someone@domain.com| map=|before_form OR after_form| form=|yes OR no| show_contact_name=|0 OR 1 OR 2 OR 3 OR 4 OR 5| details=|before_form OR after_form OR before_map OR after_map| image=|before_details OR after_details| presentation_style=|tabs OR sliders OR plain| active_tab=|details OR map OR form| type=|embedded OR modal| text=|Text to that will display when type is set to modal| modal_width=|800| modal_height=|500| modal_template=|protostar| fields=|alias=value&field_alias_2=Another value| }
Syntax explained:
- id: Contact Enhanced Contact's ID to load the form; * This is the ONLY required syntax parameter;
- recipient: you can add your custom recipient email address in order to override the Contact's default recipient ;
- type: Whether or not to display the form in a modal window; Possible values: [blank], embedded, modal;
- fields: Used to add a default value to one or more form fields; add multiple fields in a URL query syntax, where the "&" is simply a connector for multiple fields and Form Field Alias is;Example: fields=|subject=A custom subject goes here&a_hidden_field=some text&another_field_alias=A default value|
- show_contact_name: If set to 0 it hides the Contact Name, if set to a number between 1 and 5 it will control the heading size. For example if it is set to 1 it will display inside a H1 tag if set to 2 it will be displayed in a H2 tag and so on.
- Parameters only available if type=|embedded|or if there is no type parameter:
- map: Whether to load the contact map or not. Possible values: before_form, after_form, [none];
- details: Whether to load a contact details or not. Possible values: before_map, after_map, before_map, after_map, [none];
- image: Whether to load the contact image or not. Possible values: before_form, after_form, [none];
- Parameters only available if type=|modal|:
- text: Text that will be displayed in the link; Can be text or an image;
- modal_width: Modal window width size in pixels; Use numbers only;
- modal_height: Modal window height size in pixels; Use numbers only;
- modal_template: Template to load the modal window; You can choose any template installed on your Joomla site to load the Contact Enhanced form;
- presentation_style: Contact Enhanced can display a Contact Details, Map and a Form in tabs OR sliders.
- Parameter only available if presentation_style=|tabs| OR presentation_style=|slider| :
- active_tab: Choose which Tab or slider will be active when the page loads. Avaliable options are: details, map and form.
- Parameters only available if the search=|field=value| is present and if the id parameter is missing. It is a method for loading a contact by searching for the name or another contact field. For example you can load a contact form by the Contact's name and the contact name is John Smith, then use search=|John Smith|
- search_operator: If you don’t want to write the entire name, you can use the LIKE attribute. For example, if your contact name is John Smith, you can simply search for “John” and using the the LIKE attribute, Contact Enhanced will pull up the contact.{loadcontact search=|name=John| search_operator=|LIKE| }
- searchfrase: if searchfrase=|any| then it will search for any of the keywords, either John or Smith; Keep in mind that it will load the first one, ordered by ordering;
If you enable the "Button - Contact Enhanced Form" Plugin in order to help add Contact Enhanced (CE) Form into an article. It will add a button below your WYSIWYG Editor.
Important:
- Please make sure that you have Contact Enhanced component installed correctly, otherwise the plugin will not work;
- In the Plugin Parameters (Options) set the "After form is submitted show" option in order to choose the component behavior once the form is submitted;
If you are using Contact Enhanced for Joomla 1.5 you only have these options:
{loadcontact id=|ID| map=|before_form OR after_form|type=|embedded OR modal|text=|Text to that will display when type is set to modal|}
This screencast made by Dale covers the installation and usage of the Contact Enhanced plugin.
Description
With this new module we can display a form, contact details (including image) and map in a module position.
Requirements
- Have Contact Enhanced Component installed;
- Have created at least one category, one contact and custom fields;
Usage
This module is installed automatically when you purchase the PRO Package. If you purchase it separately, install the module in the standard Joomla way ergo through the extension manager.
Description
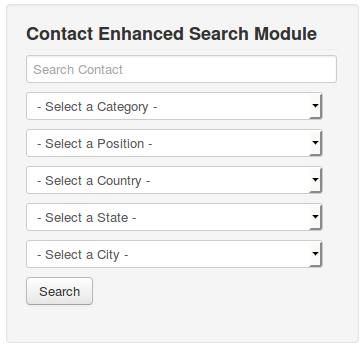
Contact Enhanced Search Module displays the a search box and optionally you can display a select box for Category, Contact Position, Country, State and City. When the Country is selected it will load therespective States for the country selected and once the State is selected it will load the cities in that state.
Demonstration page See module on the right column.
Requirements
- Have Contact Enhanced Component PRO Package installed;
- Create a Contact Enhanced -> Search menu item;
Usage

- Select Extensions → Module Manager from the drop-down menu on the back-end of your Joomla! installation.
- Select add a new module and choose Contact Enhanced Search module!
- Under the Options tab you will see all available options for this module.
Options:
- Set Itemid: Assign an ItemID for the display of the search results. Most of the Search configuration is located in the Contact Enhanced Search Menu Item, so you need to link to a menu item here.
If you do not want to display the Contact Enhanced Search menu item, you can add it to a menu type that is not visible. - Box Label: Search text field label. This label is only visible for screen readers and when you hover the search field;
- Box Width: Width of the search text field in characters. This is overridden by the CSS width if you use it (see below);
- Box Text: Placeholder text in the search field;
- Button position: Choose where you want to display the button. Default is Bottom. If you want to display the filters fields below each other, then choose Bottom.
- Search Button Image: Use an image as button. This image has to be named searchButton.gif and must be located in templates/*your template name*/images/
- Button Text: The text that appears in the search button. If left blank, it will load the 'searchbutton' string from your language file.
- CSS Code: You can add any CSS rule to load with the page. This way you can easily customize the form. By default there isCSS codefield with a CSS rule to make the fields take 95% of the horizontal space. Feel free to change it or remove this rule. If you want to load the fields on the right of each other just replace that CSS rule with this one:
#mod_ce_search_form .inputbox{margin-right:5px} - Category: You can allow your users o search within the selected categories only;
- Filter: Choose which fields you want to display to allow your users to filter;
 Description
This module allows you to create a slideshow of contacts; You might follow along with this better if we show you how we've made the front-end of the module looks like (the image on the right is for demonstration purposes. Screenshot was taken from an user's website with custom CSS styling).
Requirements
- Have Contact Enhanced Component installed;
- Have created at least one category and one contact;
- Install the module in the standard Joomla way through the extension manager.
Description
With this new module we can display the contents of a category in a list layout. We can also display multiple categories.
Requirements
- Have Contact Enhanced Component installed;
- Have created at least one category and one contact;
![]() The CE Feedback is a plugin that adds a Feedback image to the side of your site and when clicked it loads a feedback form using Contact Enhanced to allows any website user to leave a comment on your site. It loads in a modal window using Joomla default's MooTools modal window (SqueezeBox), so if your customer have a question about a particular page he can submit a feedback form without ever leaving the page.
The CE Feedback is a plugin that adds a Feedback image to the side of your site and when clicked it loads a feedback form using Contact Enhanced to allows any website user to leave a comment on your site. It loads in a modal window using Joomla default's MooTools modal window (SqueezeBox), so if your customer have a question about a particular page he can submit a feedback form without ever leaving the page.
For more info, please go to the CE Feedback page;
 Description
The extension integrates with JCE (Joomla Content Editor) and allows you to create links to:
- Contact Enhanced Categories;
- Contact Enhanced Contacts;
Description
The Contact Enhanced Custom Code plugin is a flexible plugin that allows you to write custom PHP code in order to change nearly any Contact Enhanced form behavior.
Requirements
- Have already installed the Contact Enhanced PRO package:
- Some PHP knowledge;
Basic Usage
Write your PHP Custom Code and upload to the paths provided in the basic options. The PHP file will appear in the dropdown when it is uploaded to the proper path.
Dwoo is a modern, flexible and oriented object template engine for PHP, which among other things allows you to add some logic to templates. The Dwoo Template Engine Plugin for Contact Enhanced allows you to use Dwoo template engine in Contact Enhanced templates.
Troubleshooting
Contact Enhanced for Joomla! 4.x has been completely rewritten in order to take advantage of all Joomla! 4 has to offer. We also changed some things around in order to make it easier for our users.
{gdata title=|Missing screencast| app=|none|}
Well,this can happen due to following reasons;
- PHP function mail() has been disabled or not working;
- You are running an older version on PHP in your server;
- The Sendmail Path is wrong (usually it is not the case, bacause it is typically filled in by Joomla! during the initial setup;
- You are on a local environment and don't have a mail server installed.
Here are the steps to solve it:
- Go to Admin panel > Global Configuration > Server > Mail Settings > Mailer and select SENDMAIL there,instead of PHP MAIL FUNCTION.
- If the above point doesn't solve your issue,then the best thing is to contact your webhost and ask them to rectify the PHP Mail Function in the PHP in their server and also ask them to upgrade the PHP to the latest version, OR better yet is to use SMTP instead of PHP Mail function or Sendmail.
- You can also try to change the contact email address and remove the link to a user, for some reason this solves this issue sometimes;
- Please read this other article: Why emails are not being sent?
{gdata title=|Missing screencast| app=|none|}
Not receiving your mail? It is usually related to mail server misconfiguration or security rules; Here are a few common problems to check:
- Does your account have SPAM filters?
If it does, check your junk mail folder (or trash, or whatever your particular program calls it.) It may have been received and filtered out. Fortunately most programs allow you to add it to a list of safe senders so it won't be filtered out in the future. If you set the mail settings to use SMTP usually solves this problem; - Are you sending to a legal address?
- a) Depending on how your host has things configured, sometimes you can't send a form mail to yourself@THISaddress.com if your form is on www.THATaddress.com. You may need to setup an email that corresponds to the site you are sending from, or see if your host allows you to add your other email address as an allowed recipient. Since all hosts are different, the best thing you can do is contact them.
- b) Special email sending requirements (e.g. the sender must be a valid email address in the website domain, whereas FormMail tries to make the email you receive look like it came From the person who filled out your form).
- Is the Menu configured correctly?
- Sometimes Contact Enhanced might not work properly when you copy the menu or just change before creating a new one. Delete the menu item and create a new one from scratch to make sure the menu is working properly;
- Have you been testing the "Custom reply" feature?
- You might have set up the "Custom reply" parameter to Yes. Custom reply is to be used by advanced users in order to integrate with other systems; If you don't know what it is for, please make sure it is set to No.
- Do you need authentication?
When you send email from your mail program or Joomla, you need to provide a password for outgoing mail (outgoing mail authentication?). If you are unsure because you set up your mail a long time ago, the best thing to do is ask your host. This is usually required because most mail servers nowadays have implemented DMARC policy in order to help reduce the potential for email-based abuse. For more information please go to the DMARC website.Our extensions use Joomla framework and configuration to send emails and some mail servers will not work correctly with Sendmail or PHP Mailer because of the DMARC policy mentioned above. Therefore these servers require that unauthenticated emails must be sent from or to an email address @your-domain.com, or do not allow unauthenticated emails. It seems to be your case, specially if only the copy message is sent.
We always recommend to set the mailer to SMTP in the Joomla Global Configuration under the Server tab. This will avoid many mail problems, including your contact message be marked as SPAM.
Go to Global Configuration and set these options below accordingly to your server. If you are unsure how to do it, please contact your web hosting provider and he will be able to give you this information:Mailer: SMTP Server
SMTP Authentication:
SMTP Security:
SMTP Port:
SMTP Username:
SMTP Password:
SMTP Host: - On Rochen Servers:
You can use Joomla default mailer configuration, but you might need to set "Email Sender" to Contact in Contact Enhanced's Options (button in the toolbar);
If you are using a Reseller Plan. When creating new accounts, make sureto enable SPF or DKIM records under "Email Authentication". - On Linux Servers if mail is hosted remotely:
If your mail is hosted remotely from your server make sure the domain is located in etc/remotedomains instead of etc/localdomains otherwise make sure it is in etc/localdomains;
{gdata title=|Missing screencast| app=|none|}
Contact Enhanced requires PHP5 in order to work!
Please read the news published on the PHP.net website:
On July 13, 2004, PHP 5 was released, powered by the new Zend Engine II. PHP 5 included new features such as improved support for object-oriented programming, the PHP Data Objects extension (which defines a lightweight and consistent interface for accessing databases), and numerous performance enhancements.The most recent update released by The PHP Group is for the older PHP version 4 code branch. As of August, 2008 this branch is up to version 4.4.9. PHP 4 is no longer under development nor will any security updates be released.
Therefore we advise you to update your php version.
In order to check which version you are using, please select
![]() Help → System Info from the drop-down menu on the Back-end of your Joomla! installation, then you should see the PHP version under the PHP Information tab.
Help → System Info from the drop-down menu on the Back-end of your Joomla! installation, then you should see the PHP version under the PHP Information tab.
![]() Site → System Information from the drop-down menu on the Back-end of your Joomla! installation, then you should see the PHP version under the PHP Information tab.
Site → System Information from the drop-down menu on the Back-end of your Joomla! installation, then you should see the PHP version under the PHP Information tab.
Some Ajax/JSON related features also require PHP 5.2 or newer.
{gdata title=|Missing screencast| app=|none|}
If you have a component (extension) that for some reason does generate Notices, then you can safely turn off this in Joomla Configuration.
Notices are not real errors, they are merley informations for developer in order to help them either improve the performance or to avoid some bugs due to some unitialized variables. If there are notices in our extensions, please let us know. We will work to eliminate them!
There is no real need for a joomla running website to have notices turned on, but some hosings have this as a default.
To turn notices on, follow the following steps...
As a strategy to enhance the User Experience 1 our Joomla extensions uses Joomla default messaging system. Most comercial and free Joomla templates have this capability. My template's message look like this:
If your template does not have this option, all you have to do is add a small piece of code to your template and a little css to your main css file (in case it does not have it).
Add the following code to your template where you want all system messages to be displayed, usually inside the same div that displays the content:
{gdata title=|Missing screencast| app=|none|}
Though PHP presents a very versatile and user friendly interface for handling file uploads, the default installation is not geared for working with files in excess of 2 Mega Bytes. This article will help you configure your PHP engine for handling such large file transfers.
The php.ini File
All the configuration settings for your PHP installation are contained in the php.ini file. Sometimes these setting might be overridden by directives in apache .htaccess files or even with in the scripts themselves. However you cannot over ride some of the settings that effect file uploads with .htaccess directives in this way. So let's just concentrate on the ini file. If you do not have access to your PHP configuration file might have to contact your web hoosting service provider.
To find the location of your php.ini file and the current values for the following settings that we need to modify, please go to:
![]() - Select Help → System Info from the drop-down menu on the Back-end of your Joomla! installation, then select the PHP Information tab.
- Select Help → System Info from the drop-down menu on the Back-end of your Joomla! installation, then select the PHP Information tab.
![]() - Select Site → Site information from the drop-down menu on the Back-end of your Joomla! installation, then select the PHP Information tab.
- Select Site → Site information from the drop-down menu on the Back-end of your Joomla! installation, then select the PHP Information tab.
Read more: Optimize your PHP installation to handle large file uploads
{gdata title=|Missing screencast| app=|none|}
This can be due two main reasons:
- The [Joomla]/tmp/ folder is unwritable; (most likely)
- The file size is bigger than your php memory usage limit;
Possible solutions:
Change the permitions of the [Joomla]/tmp/ folder:
- You can use an FTP client, a web file manager or change it via SSH;
Change the memory_limit:
- Locate the php.ini file used by your web server. You can use the
phpinfo()PHP function to find it. You can find this info at Help -> System Info from the drop-down menu on the Back-end of your Joomla! installation, under the PHP Innformation tab; - Edit the memory_limit parameter in the php.ini file (usually in a section called Resource Limits). Example:
memory_limit = 32M ; #Maximum amount of memory a script may consume (32MB)
If there is no section already for this, place the above line at the end of the file; - Restart Apache.
Contact Enhanced tries to inherit most of your template's styling, however some templates have HTML override for Joomla core components and/or style your core components differently. In these cases sometimes your custom field's borders will disappear. When this happens you will have to add the line below to the CE's CSS file:
If using Joomla 2.5 and newer, create a CSS Form Field type and add the CSS rule below:
.ce-container .inputbox{border:1px inset !important}Description
Translate Contact Enhanced Form Validation errors for Joomla 3.0 and newer is a very simple task, however it might be a bit more complicated for Joomla 2.5 users. Please continue reading...
Read more: Translating the javascript Error Messages and tips
Description
Migrating Contact Enhanced from Joomla 1.5 to any newer version
Procedure
If you are migrating from a Joomla 1.5 version you will need to proceed with a manual migration:
In order to achieve this you will need a little experience with PHPMyAdmin and SQL;
First of all you will need to create a full database backup, just for safety reasons, then perform these steps:
1. In PHPMyAdmin:
a) Select your Joomla 1.5 database, then select the "Export" option;
b) Select the tables below to export (#__ stands for the Joomla 1.5 database prefix for your installation, usually jos_):
#__contact_enhanced_details
#__contact_enhanced_cv
#__contact_enhanced_cf
#__contact_enhanced_messages
#__contact_enhanced_message_fields
c) Select the Format to SQL;
d) Export the selected tables;
2. In the exported SQL file or SQL content, find out which database prefix you used for the new installation, usually j25_ or some random characters, then replace your old Joomla 1.5 prefix for the the new one;
3. In PHPMyAdmin, select the database for the new version (if a different database), then run the query (with the changed prefix);
4. In the migrated site install Contact Enhanced 2.5 and it will perform all other migration tasks;
In this situation (manual upgrade), only the Categories will not be imported, so you will have to manually create them and re-configure Contacts and Custom Fields. You will be able to use the Batch features to re-configure, so it should not be a hard task.
Integrations with other extensions
Contact Enhanced is now compatible with AMP (Accelerated Mobile Pages), with a few exceptions.
Setting up
Tested with JAmp
We've tested with JAmp, but it should be compatible with any Joomla AMP plugin, as long as it has similar options and supports AMP Ajax Forms.Read more: Compatibility with AMP (Accelerated Mobile Pages)
Copyright © 2018 IdealExtensions.com. All Rights Reserved.
We may collect your IP address and your browser's User Agent string while using our site for security reasons and deriving aggregate information (analytics). This information is retained for a minimum of 1 and a maximum of 24 months.